The start of the new year is often when most people declutter their closets. In with the new and out with the old. Are you fully aware of the clothes you have in your closet? Why not start 2024 with a well-organized closet using Acloset’s 5-step plan? You can escape the stress of choosing daily outfits from a messy closet.
Step 1 : Pull out all your stored clothes
Decluttering your closet starts with knowing what you have. So, first, remove all the stored clothes in your house. This includes clothes from boxes in the garage and attic, drawers, closets, under the bed, in the basement, etc. To make decluttering simple, you can also sort your clothes by item category.

Step 2 : Identify your clothing types
Separate the different piles of clothes into three groups. These are ‘clothes I wear,' ‘clothes I don’t wear,' and ‘clothes I don't know how to wear.' Generally, we believe that we know our clothes, but that’s not true in most cases. In fact, you might find a ‘hidden treasure’ like certain clothing items you didn’t even know you had.

Usually, the advice we receive is to simply get rid of clothes we don’t wear. However, with Acloset, you can learn about the potential of your clothes and how to wear them. If you’re done sorting your clothes, go to Step 3 and start uploading ‘clothes I wear' and ‘clothes I don't know how to wear' to Acloset, your magical digital closet.
Step 3 : Add your clothes
It's time to load your clothes into Acloset. We'll help you create your own closet with ease.

Add clothes by tapping + button in the bottom of center
Option 1 : Take a photo
The first way to load your clothes on Acloset is by taking a photo of the clothing items. Arrange the clothes neatly on a flat surface like your room floor or your bed. Then take a picture of each item, and upload the pictures to Acloset. Our AI engine will automatically remove the image background and analyze the item.
Pro tip 💡 By placing the items on a flat surface or hanging them on hangers, you will get a clearer picture of your clothes. It’s better to take your picture with a plain background, like a white wall or solid floor color, so that Acloset’s AI can erase the background accurately.


1. Once your items are organized neatly, you can press the camera icon.
2. You don’t have to remove the background yourself; our AI will do it for you.
3. Check out the automatically analyzed clothing details for more information.
Option 2 : Search by stores
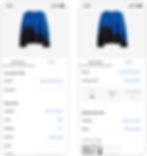
Another way to add your clothes is to search for items from online stores. You can search for your favorite brand in the search box and find the clothes you have on the website. If you find the clothes, simply capture the image.


1. You can select a site or enter it manually.
2. You can register the photo right away by clicking ‘capture.’
3. The AI will automatically analyze the items in the images and remove the background.
Pro tip 💡 When you upload a photo, our AI engine automatically fills in information such as the item's brand, color, category, and material. Simply check the information analyzed by our AI. Adding more information, like purchase details, personal notes, hashtags, etc., are also helpful when you find and review your items in the future.
Step 4 : Create your digital closet
When you finish uploading your clothes images, you can think of nicknames for your digital closets. Based on your preferences, this is like Pinterest’s pinboard. Winter closets, work closets, travel closets, and children’s closets are a few examples. View all your closets from your profile immediately. This is how your digital closet will look in Acloset.

Step5 : Enjoy the statistics of your closets
Now that you’re done creating your digital closets, you can figure out the kind of clothes you have, the brand you spend the most money on, and the most common colors in your closet. You can have fun getting to know yourself in ways you didn’t know before.

Your own digital closet is now complete! View your clothes anytime, anywhere!
Why not find your personal style right now?


